Over Christmas I acquired a Raspberry Pi 5 and an Arduino UNO R3. This cascaded into a sprawling array of projects, mostly unrelated to the initial hardware.
Part 1: IoT
Initially I thought to set up the Arduino as a remote temperature sensor, reporting back to the Raspberry Pi running InfluxDB and Grafana.
First problem: the temperature sensor I bought (BME680 on a Grove board) was designed to be plugged into an expansion board, and I didn’t have any other jumper cables. Did what I should have done at the start and bought a full starter kit, which not only had plenty of cables, but also other sensors to play around with. This included another temperature sensor, but of a different type: the DHT11. And another redundant Arduino board. I can’t get over how cheap they are!
Second problem: UNO R3 doesn’t support WIFI. (Pretty major oversight on my part.) Solution: switch to an ESP8266 development board. Even cheaper! Got a twin pack just because for an extra $A7 it felt like losing money not to. For those keeping track, we now have four Arduino-like devices. I also bought a 5-pack of DHT11 temperature sensors because they were super cheap ($A10) and thought it would be good to have a few extra.
While I initially used a breadboard for prototyping, after realising I didn’t need an extra resistor I connected the DHT11 directly to the ESP8266 using the three jumpers that came with it. It was straightforward to cobble together code snippets to take a reading every two seconds and report back to an InfluxDB instance (which we’ll get to later.) It works! I immediately made a second one using the extra parts I had.
But it’s ugly raw electronics, and I don’t want that just lying around the house. I made ugly enclosures instead.
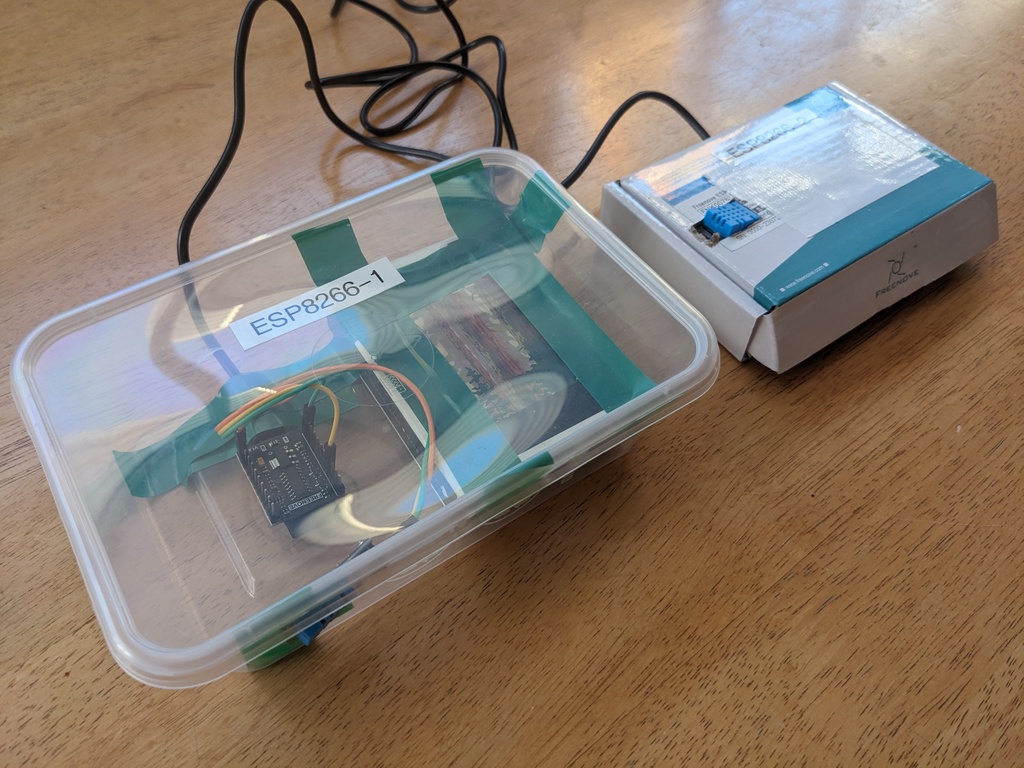
The first used the box the ESP8266 came in, which wasn’t quite big enough so didn’t always close properly. It was also so light that the cable wagged it trying to get it to sit still. As it was also opaque, I couldn’t see the onboard LED I’d configured to turn on for any error states. Version two I used a larger plastic takeout container, using an old soldering iron to melt some holes, a deck of cards to add some heft, and electrical tape to hold it all together. Label printer to remind me which device was in which box. Big improvement.

While rummaging to find extra cables, I found an old Awair Element I’d forgotten I had, adding a third sensor to the mix. It has a local API which I bridged into InfluxDB with a simple Ruby script I had Claude write for me. (Let’s take that as a given from now on, AI is a default part of my coding workflow now.)
I was however, unsatisfied. While cheap, the DHT11 is rated for ±2C accuracy, which holds up poorly against the Awair’s ±0.2C range. The DHT20 is rated for ±0.5C and while a whopping ~250% more expensive … is still only $A5 per unit. They have a fourth pin and use an alternate communication method (I2C), but were still straightforward to code up.
Final remaining task was a Grafana dashboard. I’m proud of including the error bars for the respective sensors, which wasn’t straightforward and made liberal use of overrides.

But where and how is Grafana running? Didn’t we skip over InfluxDB? On to the next section!
Part 2: Pi Server
To configure the Raspberry Pi, I initially tried Ansible but quickly lost patience with the amount of YAML and slow turn around times. Really, I just want to run bash scripts with some semblance of idempotence. So I coded up my own Ruby micro-framework (inspired by Babushka) that could run commands and scripts over SSH, with basic task met/meet definitions, dependencies, and templated config files. This worked great! Using it I configured the Raspberry Pi with:
- InfluxDB for time-series data storage.
- Grafana for graphs.
- Blocky for DNS (more below).
- Nginx as a somewhat gratuitous reverse proxy to the above.
- Telegraf for reporting system metrics into InfluxDB.
It also controlled a number of other system config, such as SSHD and the MOTD.
For alerting and backups, I used Amazon SNS and S3 respectively. To configure those I used Terraform. InfluxDB is backed up once a day, and any errors on the system can send me a text message using a wrapper that posts to SNS using the AWS CLI.
InfluxDB
I picked InfluxDB because it seemed popular for this use case and appeared to have a reasonably standard open-source-with-enterprise-option model. I did enjoy using it: the UI works great, the API is easy, I liked the Flow query language. As I went about hardening it however I came across a deal breaker: the open source version has no support for any kind of replication! Also it seems no one else liked Flow, and they’re removing it in the next version.
I’m in the market for an alternative. Am currently considering Timescale, which would be a comfortable pick as postgres is familiar, or Clickhouse, which would be more of a learning opportunity.
Grafana
First time I’ve used it. Seems great? I use the UI to configure dashboards to taste, then copy the JSON version into config management for storage and repeatability.
Blocky
I initially went to set up Pi Hole for DNS level ad-blocking, but it seemed too “configure by UI,” particularly once I started adding in other DNS resolution tasks I wanted it to do. While I’m sure it would have been workable, in researching I discovered Blocky which was a much better match for my needs.
This is the first time I’ve tried DNS-based blocking, and I don’t think it’s workable in a shared household. The failure mode (failed page load) is too drastic and unexpected for non-technical users to be able to navigate. Switching to Brave on clients is feeling like a more sustainable option. I’d still like to use DNS blocks on my personal machines, but to configure that I’d either need to take over DHCP from my router, or manually configure my machines, neither of which I’ve done yet.
I still use Blocky to advertise internal .home addresses, but with all blocking disabled - it simply forwards everything else to upstream DNS.
Nginx
Rather than accessing Grafana or InfluxDB on their respective ports (grafana.home:3000), I wanted to reverse proxy them such that I could get a nicer URL (grafana.styx.home), HTTPS, and centralised authentication to potentially then expose externally (grafana.home.xaviershay.com). This is bread and butter stuff for Nginx and the config was straightforward., noting I haven’t actually implemented HTTPS or authentication yet.
Cloudflare Tunnels looked like an interesting way to expose my server to the internet, and the easiest way to enable that would be to host my DNS with Cloudflare. I currently use DNSimple, who I am neither happy nor unhappy with, but this also felt like an opportunity to bring my DNS config under Terraform management. A side quest! I wrote that process up separately.
And of course I haven’t played around with Tunnels yet…
Raspberry Pi
After installing the Pi in a case, the fan ran at full tilt continuously. While this did bring CPU temperatures down below 40C, that’s well below safe operating temperature and was quite noisy. I suspect some installs have fan control enabled by default, but the particular pre-installed Raspbian OS I had didn’t. I needed a custom firmware config to calm it down - it now holds the temperature at around 60C pretty much silently.
In hindsight, I’m not taking advantage of any of the Pi’s unique features (e.g. the GPIO pins) and would have been better off going with a cheaper mini PC.

Part 3: Development & Virtualisation
During this journey, I irrecoverably bricked my Ubuntu development VM that I was running in VMWare Player on my windows desktop. (No idea exactly how, just overdid it I guess?) I have been unhappy with this setup for years and has continued to suffer from neglect. Clipboard sharing has been broken for over a year, it’s sluggish, and generally not super enjoyable to work in. I haven’t done enough development to motivate me to fix it however. Until now.
I’d been using Visual Studio Code (VSC) for some local windows development, and also for messing around with new languages as its typically easier to get an “instant” IDE using extensions than configuring Vim. I thought to go all in on WSL (the Linux compatibility layer), and it worked well for simple scripts and development. For example, I built the micro-framework mentioned above using it.
Unfortunately for larger projects – including running Terraform and compiling this blog – it runs about an order of magnitude slower than I’m used to, which was unacceptable.
I briefly tried VirtualBox as an alternative to VMWare, but it also felt a bit sluggish and gross.
Time to bite the bullet and get a dedicated machine. Inspired by the Raspberry Pi, I found another mini PC suitable for my needs. Beelink, Trigkey, and GMKTec all have similar options in the $A200 price range. I nearly went with Beelink as the most trusted brand, but last minute switched to Trigkey because … I liked the case better.
Before setting it up as dedicated machine, I first wanted to take advantage of having a spare computer to experiment with Proxmox for virtualisation. While I didn’t hold out much hope, I thought to at least try hosting a VM there and connecting to it via Remote Desktop. (It would have to perform much better than VMWare for this to be workable, which while unlikely given my mistreatment of VMWare was at least plausible.)
This turned out to be more complicated than I was hoping, and in the process of working through it i realised I had an even better option available to me: VSC’s remote development extension. It comes in two flavours: one that installs VSC stuff on the server itself, and one that uses pure SSH. I went with the former.
For my Linux distro I wanted something minimal, headless, and Debian-based. I wasn’t too worried about package currency: I’ve found that for development of e.g. Ruby you need to manage it yourself anyway. Debian itself looked like a great option, but for a bit of spice I opted for Devuan – a fork that’s only change is to revert systemd. I don’t know enough to have strong feelings about systemd, but a lot of people do and this seemed like an opportunity to learn by doing. Not that this install was going to be running much anyway.
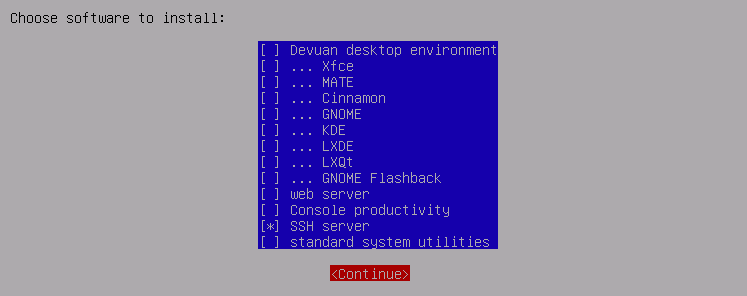
Using Proxmox I installed Devuan with an SSH server being the only optional extra. (Make sure to install 64-bit, VSC remote is incompatible with 32-bit. Ask me how I know.)

Proxmox makes it really easy to create and rollback to snapshots, which I loved. This let me quickly iterate on my setup scripts to ensure they would work from a cold start. My process was:
- Install Devuan from netinstall ISO over console.
- Post-install, login as root via console and enable SSH access for root and get the IP address of the machine. Console access no longer required, and all future steps can be done remotely via SSH.
ssh-copy-idto enable passwordless login.- A short bootstrap script as root that installs avahi to advertise
hostname.localrather than needing to use an IP address, and gives my non-root account passwordless sudo and SSH access. - The machine is now able to be configured using the same micro-framework used to configure the Raspberry Pi. (This removes SSH access for root.)
From there I can install latest Ruby, Terraform, clone my common git repositories, etc… In putting this bootstrap together I assumed that Devuan hadn’t created a non-root account for me, but it actually does during install. Reading back now, it’s quite likely that SSH is already available to the non-root user which could simplify the process… Something I will be able to easily test in the future with snapshots!

This post was written using this new setup. I also finally wrote a helper script I’ve been putting off for years to auto rebuild the site on content changes, and to restart the web server on file changes. I know there are third-party tools that can do this, and do it better (i.e. using fsnotify), but I find this no frills version aesthetically pleasing. I can run both of those in a split terminal window inside VSC.

Part 4: Hardware
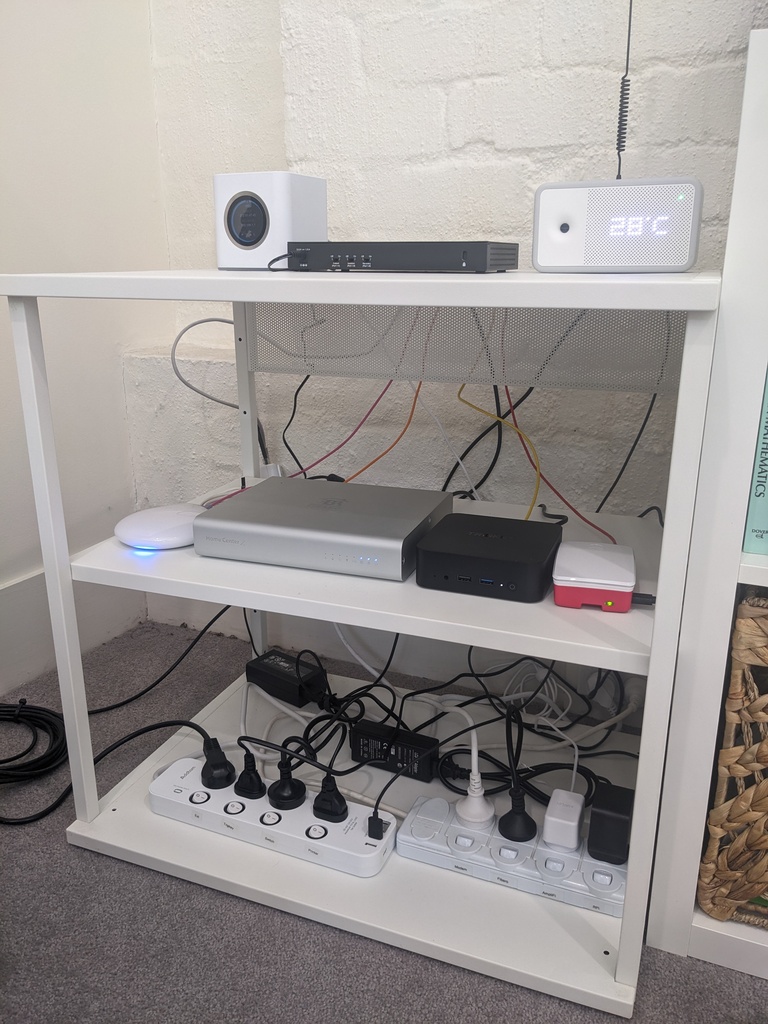
To recap, we’ve added a Raspberry Pi, a Trigkey mini PC, and an Awair Environment sensor to the lab. This is in addition to the pre-existing AmpliFi router, Fibaro Home Center, and a Powerview Hub. With that I’d run out of ports on my router, so also needed to add a new switch. I got a POE one, thinking I could use it to power my antenna modem directly rather than the current breakout box, but between purchase and receipt I realised that the voltages don’t line up and it would complicate my Ethernet routing. So I’m not currently using any of it’s POE functionality. I also bought a selection of shorter CAT5 cables which were a vast improvement over the voluminous coils of accumulated lengths making a mess previously. I also labelled the power switches.
For an intense 24 hour period I was excited about getting a proper rack, before reason prevailed: I don’t have any rack mountable gear, and the shelving I have is effectively a highly functional rack anyway.

Part 5: Future Ideas
I might not do any of these, but still remaining on my list for the future:
- Expose to the internet at
home.xaviershay.comusing Cloudflare Tunnels. - Replace InfluxDB.
- Create a secondary backup for the Pi, get some semblance of availability.
- Finish setting up Grafana system dashboards, including adding Proxmox to it.
- Split network such that I can put servers and my personal devices on local DNS, and have everything else bypass.
- Switch from SMS to push notifications for failure notifications.
- Add a ZWave module to the Pi to try controlling my lights.
- Place a camera over our balcony garden for remote monitoring.
- Wire an ESP8266 to a solenoid valve for automated watering.
- Get Arduino development from VSC working, rather than Arduino IDE.
- Unified launcher for our TV (open source Roku?)